Project_5_ESP32_LED_Switch_Web_Server.ino, then open it in the Arduino IDE (setup: Foundation 3). Remember to set your Wi‑Fi credentials.
diagram.json above and paste its wiring in to load the circuit.
🎯 Objective
By the end of this project, you will:
- Connect the ESP32 to a Wi-Fi network and find the IP address it was given.
- Host a web page directly from the board, with no cloud service involved.
- Understand what an HTTP request and response actually look like as text.
- Route a request: read the URL a browser asked for and act on it.
- Control two GPIO outputs from a phone or laptop on the same network.
- Keep the page in step with the board by tracking each output's state in a variable.
1How an ESP32 web server works
- The ESP32 joins your Wi‑Fi and gets an IP address.
- It listens on port 80 for browsers (clients).
- Visiting
http://<ESP_IP>/returns an HTML page. - Each button links to a special URL (e.g. "ON" →
/26/on). The ESP32 sees the path, switches the LED, and re‑sends the page.
That request‑then‑respond loop is the heart of every web‑server project in this kit.
2Set your Wi‑Fi credentials first
Edit these two lines in the sketch with your network name and password:
const char* ssid     = "REPLACE_WITH_YOUR_SSID";
const char* password = "REPLACE_WITH_YOUR_PASSWORD";
3Parts Required
| Qty | Part | Notes |
|---|---|---|
| 1 | ESP32 · breadboard · jumper wires | - |
| 2 | LED | Have polarity |
| 2 | 220 Ω resistor | One per LED |
4Wiring the Circuit
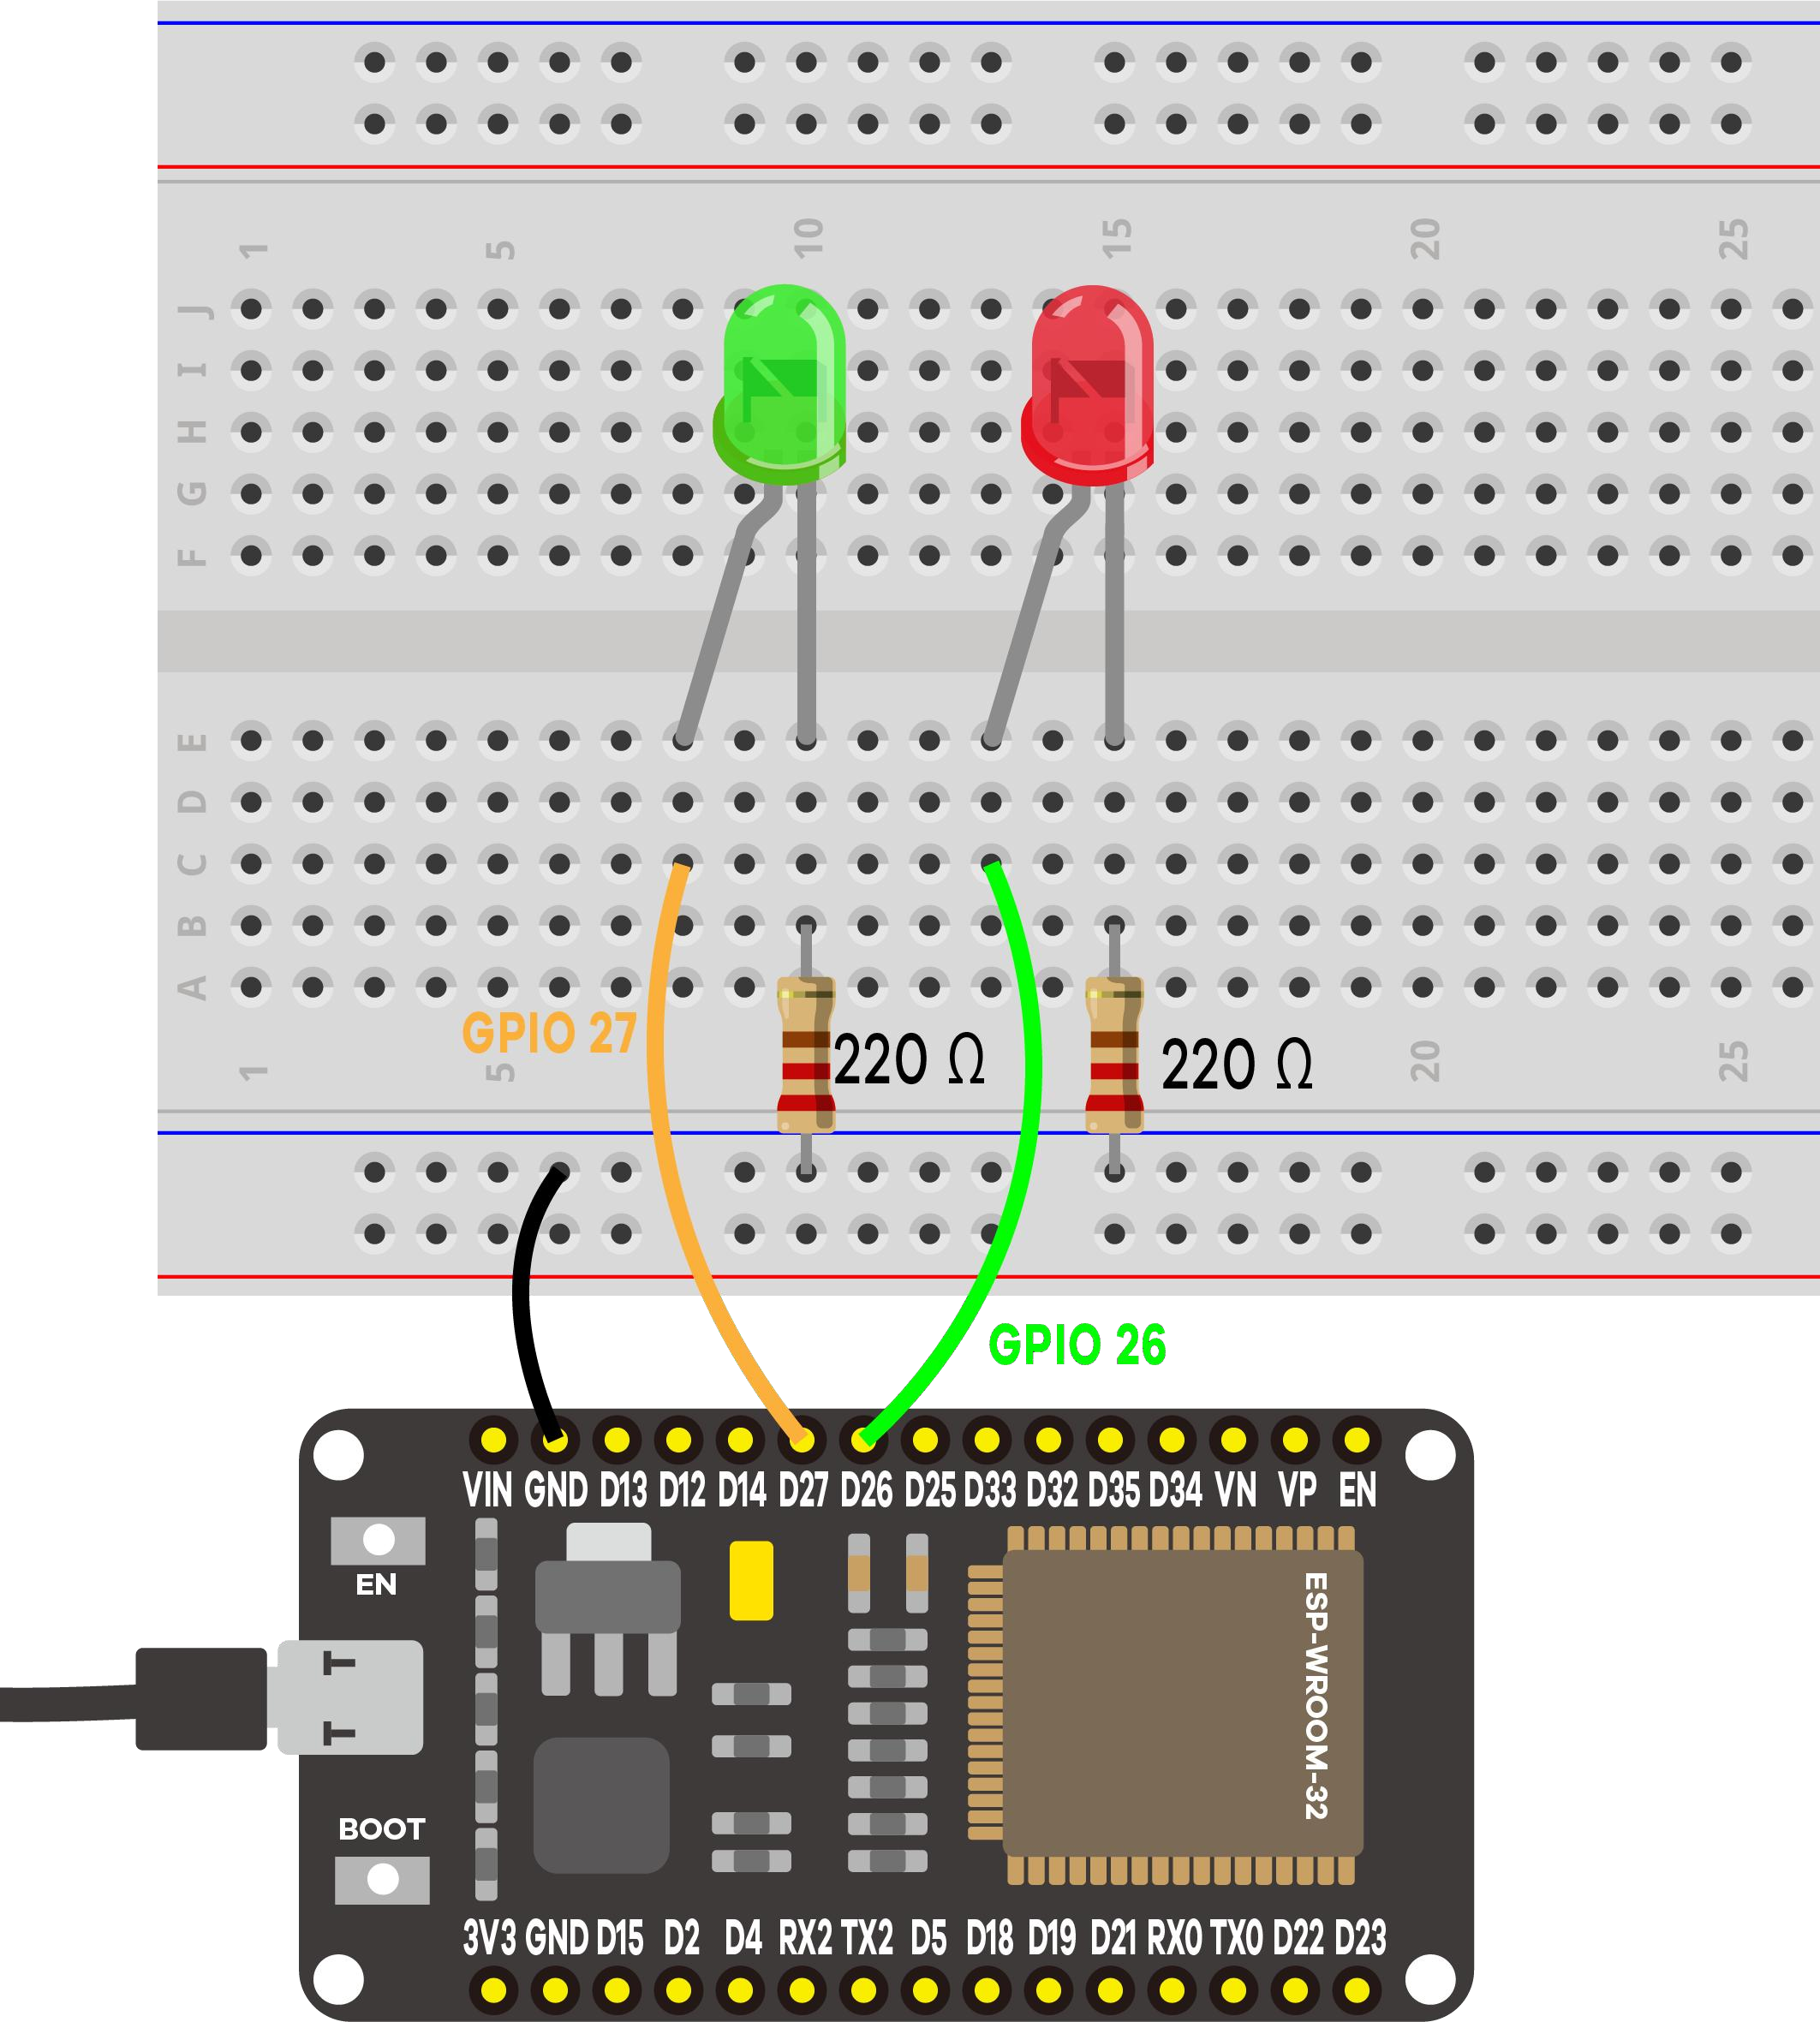
For each LED: GPIO → 220 Ω → LED anode (long leg); cathode (short leg) → GND.
5Find the IP & open the page
After uploading, open Serial Monitor at 115200 and press EN/RESET:
==============================================
 Project 5: ESP32 LED Switch Web Server
==============================================
LED 1 -> GPIO 26
LED 2 -> GPIO 27
Connecting to Wi-Fi: MyNetwork
....
Wi-Fi connected!
Open this address in your browser:  http://192.168.1.42
----------------------------------------------
Open that address in a browser on the same network:
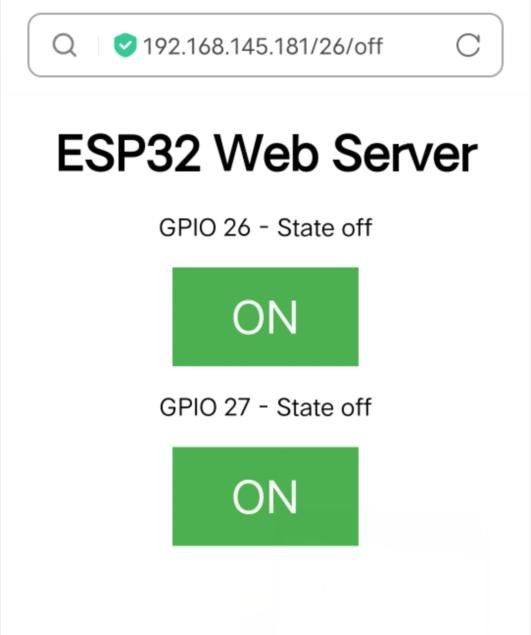
[WEB] New client connected
[WEB] LED 1 (GPIO 26) -> ON
[WEB] Client disconnected
6Code Walkthrough: Understanding the Sketch
The longest sketch so far, but only four ideas: join Wi-Fi, wait for a browser, read which URL it asked for, and reply with a page.
Step 1: Credentials, the server object, and the state we track
#include <WiFi.h>                 // the ESP32's Wi-Fi library

const char* ssid     = "REPLACE_WITH_YOUR_SSID";
const char* password = "REPLACE_WITH_YOUR_PASSWORD";

WiFiServer server(80);            // listen on port 80, the normal HTTP port

String header;                    // the request text the browser sends us
String output26State = "off";     // what we believe each LED is doing
String output27State = "off";
WiFiServer server(80) creates a server but does not start it yet. Port 80 is the default for http://, which is why the address you type needs no :port suffix. The two state strings are the sketch's memory of what it did: the ESP32 cannot ask an LED whether it is lit.
Step 2: connecting to Wi-Fi in setup()
digitalWrite(output26, LOW);      // start with both LEDs off

WiFi.begin(ssid, password);       // start joining the network
while (WiFi.status() != WL_CONNECTED) {
  delay(500);
  Serial.print(".");              // one dot per half second
}

Serial.println(WiFi.localIP());   // the address to type in the browser
server.begin();                   // now start listening
Joining takes a few seconds, so the while loop waits for WL_CONNECTED. Each dot is one turn of that loop: if dots scroll forever, the credentials are wrong or the network is 5 GHz. WiFi.localIP() is whatever address the router handed out, usually different each time, which is why the sketch prints it rather than hard-coding it.
Step 3: loop() serves one browser request at a time
WiFiClient client = server.available();   // has a browser connected?

if (client) {
  while (client.connected() && ...) {
    if (client.available()) {             // a byte arrived
      char c = client.read();
      header += c;                        // collect the whole request

      if (c == '\n') {                    // end of a line
        if (currentLine.length() == 0) {  // a BLANK line ends it
          client.println("HTTP/1.1 200 OK");
          client.println("Content-type:text/html");
          client.println("Connection: close");
          client.println();               // blank line ends OUR header

          if (header.indexOf("GET /26/on") >= 0) {
            output26State = "on";
            digitalWrite(output26, HIGH);
          }
          // ... then send the HTML page
          break;
        } else currentLine = "";
      } else if (c != '\r') currentLine += c;
    }
  }
  header = "";
  client.stop();                          // hang up
}
The part worth slowing down for is the blank line. An HTTP request is a set of text lines followed by an empty one, which is how the browser signals "that is my whole request". The sketch watches for a \n arriving while currentLine is still empty and treats that as the cue to reply.
The buttons are ordinary links pointing at /26/on, /26/off, /27/on and /27/off. Clicking one asks the ESP32 for that URL, indexOf() spots which, and the LED is switched before the page is redrawn with its new state.
Key concepts: what each line really does
| Code | What it does |
|---|---|
WiFiServer server(80) | Creates a listener on port 80, the default for http://, so browsers connect there without being told. |
WiFi.begin(ssid, password) | Starts joining the network and returns immediately. The connection completes in the background, which is why the loop polls WiFi.status(). |
WiFi.localIP() | The address the router assigned. Type it into a browser on the same network. |
server.available() | Returns a client if a browser has connected. The "has anyone knocked?" check. |
client.read() | Pulls one byte of the request. Every byte is appended to header so the whole thing can be searched afterwards. |
currentLine.length() == 0 | Detects the blank line ending an HTTP request: the signal to start replying. |
client.println("HTTP/1.1 200 OK") | The status line, "your request worked". Content-type tells the browser to render the reply as HTML. |
header.indexOf("GET /26/on") | Searches the request for a URL. indexOf returns a position or -1, so >= 0 means "the browser asked for this". |
client.stop() | Closes the connection. Connection: close warned the browser, so it does not wait for more. |
timeoutTime | Guards against a client that connects then goes silent, so one browser cannot hang the loop forever. |
Going further: other HTTP status codes you'll meet
200 OK is the status this project always sends, because everything it does succeeds. Real servers send different codes depending on what happened, and you'll recognize them once you start reading browser dev tools or debugging Projects 11 and 12's cloud connections:
| Code | Means | You'll see it when |
|---|---|---|
| 200 OK | The request succeeded | Every response in Projects 5 to 9 |
| 301 / 302 | Redirect: go look somewhere else | A server sending you to a different URL |
| 400 Bad Request | The server couldn't parse what you sent | A malformed query string |
| 401 / 403 | Unauthorized / Forbidden | A request missing credentials (this project checks none) |
| 404 Not Found | No handler matches that URL | Typing a path this sketch never defined |
| 500 Internal Server Error | The server crashed handling the request | A bug on the server's side, not yours |
The first digit is the shortcut: 2xx means success, 3xx means "look elsewhere", 4xx means the client (browser) made a bad request, 5xx means the server broke.
7Demonstration
🎯 Knowledge Check
1. On which port does the ESP32 web server listen for HTTP requests by default?
2. What does WiFi.begin(ssid, password) return immediately?
3. How does the ESP32 know which button was clicked on the web page?
4. What is the blank line in an HTTP request used for?
5. Why does the ESP32 need to store LED state in variables?
9Wrapping Up: What You've Learned
Your board is now a server: something other devices connect to. That is the step that turns a microcontroller project into an Internet of Things project.
- The ESP32 joins a normal 2.4 GHz network with
WiFi.begin()and gets an IP from the router. It cannot see 5 GHz networks at all. - A web server waits on a port (80 for HTTP) and answers requests;
server.available()hands you a client when a browser connects. - HTTP is just text: a request is lines ended by a blank line, a response is a status line, headers, a blank line, then the page.
- The URL carries the command. Links like
/26/onare how the browser tells the board what to do. - The ESP32 builds the HTML itself and includes the current state, so the page always shows what the board believes.
- The board keeps its own state variables because it cannot read back what an output is doing. Project 8 shows what happens when a physical button changes that state behind the page's back.
- You just hand-rolled the HTTP parsing yourself, one byte at a time. Project 6 does the same by hand once more; from Project 7 onward the course switches to the ESP Async WebServer library, now that you've seen what it's doing under the hood.
Now try
- Add a third LED: Wire a third LED to GPIO 25 and add ON/OFF buttons for it on the web page.
- Show the uptime: Add a line to the page that shows how long the ESP32 has been running since the last reset, using
millis().
10Troubleshooting
| Symptom | Likely cause | Fix |
|---|---|---|
| Stuck on "Connecting…" dots | Wrong credentials / 5 GHz network | Fix SSID+password; use 2.4 GHz |
| Page won't load | Phone on a different network | Same LAN for phone + ESP32 |
| LED reversed | Polarity | Long leg toward the 220 Ω side |
| Monitor blank | Wrong baud | Set it to 115200 |